So you are building a boat and wondering whether to put foam in the flotation chambers. I'll share my thoughts. But in the end, you have to decide.
Are you required to have flotation?
First, let's ask, "Am I required to have flotation?"
Do your own lawyering - review the applicable regulations and decide for yourself.
Me? I don't mass-produce boats for sale and I don't care what the regulations say.
Should you have flotation?
Whether required or not, should you have flotation?
Remember that you boat's hull is it's flotation. The hull is the primary flotation. Hopefully you have built a hull that floats.
If for some unexpected reason, your hull suddenly stops floating, it would be nice to have other flotation, such as secondary flotation.

The remainder of this post will use the term "flotation" to mean "secondary flotation."
I am not concerned with my hull suddenly not floating. I count on workmanship and seamanship to ensure that it floats. I have many boats without flotation and I am quite comfortable motoring, rowing or paddling without flotation. However, if during construction of your boat you encounter a convenient means to provide flotation, why not include flotation?
If you install lockers for storage, think about installing the locker access on the top and everything beneath being water-tight. That way, the only way water can get into the locker is through the top. If you have water that deep in your boat, you have bigger problems than the locker flotation..
Storing fishing gear and ropes in the locker reduces it's buoyancy but it still has some trapped airspace that has flotation.
You can't fill the locker completely with foam, otherwise it cannot be used for storage. Maybe you can fill it partially with foam.
A common flotation space is between the deck and the hull bottom.
I decided to use the space between my deck and my hull as secondary flotation. There are twelve separate bulkheaded chambers below my deck. I did not install any foam.

I also install a forward locker with a lid that will provide some secondary flotation.

To Foam or Not to Foam
Foam or airspace?
Airspace or plastic soda bottles?
Plastic soda bottles or ping-pong balls?
First, let's talk about the advantages and disadvantages of foam and airspace...
If you have a hull breach below waterline, it would be nice to have foam to minimize water intrusion. Of course foam would be nicer than air, obviously foam is the way to go!
But wait...what if you do not know about the leak? It's a pin hole and is slowly saturating your foam. It has been there for years. Then, one day, you think, "Gee it sure was hard pulling the boat onto the trailer. The boat seems heavier than normal."
So you launch the boat and notice that the starboard stern seems to be lower in the water than the rest of the boat. This leak and saturated foam is not that bad since, well, you have been motoring around with it for a while and never noticed it until today. And even today was a good day of boating and you did not notice the list until pulling the boat out and re-launching.
If a tree falls in the woods and nobody hears it, does it make a sound?
If a boat's hull leaks and it doesn't affect the boat, does the leak matter?
...not until the foam starts to rot.
Now you discover that the entire flotation chamber is saturated with water and the foam is doing nothing more than keeping the water in.
So you drill a hole to drain the chamber and three years later the water has still not completely drained from the foam and the foam is moldy and starting to rot your wooden boat hull.
As you embark on severely intrusive surgery to remove the foam (in medical terms, a foamectomy) you cuss the foam and wish you would have never installed it. You really wish your flotation chamber was just a sealed airspace.
Now let's flip the scenario...
You are planing along at 25 knots when you hit a submerged steel shipping container. It blasts a hole 6-inches in diameter in your hull. After picking your teeth out of the steering wheel, you think, "Boy, I sure am glad that I have foam." So, in this case, foam was the right choice, unless...
You are planing along at 25 knots when you hit a submerged steel shipping container. It blasts a hole 6-inches in diameter in your hull. After picking your teeth out of the steering wheel, you think, "Boy, I sure am glad that I have bulkheaded airspace chambers."
In this scenario, foam is a good idea if you have no bulkheads. But if you have bulkheaded airspace chambers, is foam a good idea? Yes, until you develop a pinhole leak that you do not know about.
There is no clear-cut answer to the "To foam or not to foam" question.
What is foam?
The word "wax" represents many things. The moon has a "waxing" phase. You can "wax" philosophically. There is floor wax and candle wax. Ocassionally one mobster "whacks" another.
Like the word "wax", "foam" is a generic term for many things.


If you are wearing shoes, there is probably foam in the sole. If you are sitting, there is probably foam in your chair or sofa.
Foam is a lattice with air space. Like a house of cards but the cards are glued together for strength.

The world's neatest foam is Aerogel. Google it or read about it in "Stuff Matters: Exploring the Marvelous Materials That Shape Our Man-Made World" by Mark Miodownik.
In "closed-cell" foams, each chamber is surrounded by six cards and there is no way out. Theoretically, water cannot move through closed-cell foams. In reality, regardless of what the foam salesman says, no foam is 100% closed cell.
In "closed-cell" foams, each chamber is surrounded by six cards and there is no way out. Theoretically, water cannot move through closed-cell foams. In reality, regardless of what the foam salesman says, no foam is 100% closed cell.
In "open cell" foams, each chamber has an opening to other chambers and water can flow through. Although, due to the tiny size of the chambers and the surface tension of water, the water does not move easily through.

The most common types of foam used for flotation are rigid and flexible foams. Here is a description of the four common boat flotation foams.
There is lots of technical information on these foams but be leery of the manufacturer's information. They have a way of twisting the facts to enhance sales.
Urethane
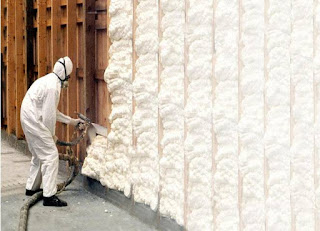
Often called "urethane," polyurethane rigid insulation is commonly used for boat flotation foam. It is the coolest of all foams because it comes as a liquid aerosol in a can or a two-part liquid mix. You can spray the liquid into odd-shaped spaces and watch it expand. Or, you can mix parts A and B and poor the mix into odd-shaped spaces and watch it expand and fill the space.


If you mix A & B, move fast, it starts to expand and cure soon after mixing. And, don't mix and pour big batches. Use several small batches to avoid the expansion exploding your flotation chamber.
It cures solid in minutes.

But, the liquid form is nasty dangerous toxic. Consult the MSDS and use PPE!!
Urethane foam has excellent resistance to liquid hydrocarbons (oil, gasoline, diesel, etc.)
Urethane foam has excellent resistance to liquid hydrocarbons (oil, gasoline, diesel, etc.)
Other than the toxicity of the liquid form, the down side of urethane is that it is open-cell and, over time, it absorbs water. If submerged, it will saturate in a matter of months. Once saturated, it will take months or years to dry out.
I once took a saturated brick of urethane and dried it in a soil-drying oven. It took six months in the oven to completely dry out. When saturated, the water weighed ten-times the weight of the dry foam.
Urethane foam is usually white or orange in color. Its dry density is typically two or four pounds per cubic foot and its compressive strength is 15 to 25 pounds per square inch.
Like "wax" and "foam," "styrofoam" can mean a variety of things. With respect to boat flotation, the two common styrofoams are expanded polystyrene and extruded polystyrene. They are quite different.
Expanded polystyrene is the most common type of styrofoam. It is what foam coffee cups and styrofoam coolers are made from. It is tiny white foam beads stuck together. The beads are small but you can see the beads. If you crush it, it becomes are pile of white beads. It is often called "bead board"


Similar to urethane, it is made by mixing chemicals together and allowing the mix to expand and cure. The mixing and curing are done at the factory. The resulting blob is cut with hot wires into rigid boards. The boards are usually 2 or 4-feet by 8-feet and 2 to 4-inches thick.
Although not as permeable to water as urethane, expanded polystyrene absorbs water. It is kinda open-cell. The voids between the beads are connected for free flow of water. Although no foam is completely water resistant, the beads themselves are fairly water resistant.
The challenge with rigid board insulations is fitting them into odd-shaped spaces.
Urethane foam is usually white or orange in color. Its dry density is typically two or four pounds per cubic foot and its compressive strength is 15 to 25 pounds per square inch.
Styrofoam - Expanded Polystyrene
Like "wax" and "foam," "styrofoam" can mean a variety of things. With respect to boat flotation, the two common styrofoams are expanded polystyrene and extruded polystyrene. They are quite different.
Expanded polystyrene is the most common type of styrofoam. It is what foam coffee cups and styrofoam coolers are made from. It is tiny white foam beads stuck together. The beads are small but you can see the beads. If you crush it, it becomes are pile of white beads. It is often called "bead board"


Similar to urethane, it is made by mixing chemicals together and allowing the mix to expand and cure. The mixing and curing are done at the factory. The resulting blob is cut with hot wires into rigid boards. The boards are usually 2 or 4-feet by 8-feet and 2 to 4-inches thick.
Although not as permeable to water as urethane, expanded polystyrene absorbs water. It is kinda open-cell. The voids between the beads are connected for free flow of water. Although no foam is completely water resistant, the beads themselves are fairly water resistant.
The challenge with rigid board insulations is fitting them into odd-shaped spaces.
Styrofoam - Extruded Polystyrene
Extruded polystyrene is a type of styrofoam used commonly in wet environments. Although not completely water resistant, it is considered to be "closed-cell" and it is fairly water resistant. It takes years, maybe decades, of submersion to saturate it. It saturates faster under a thermal and vapor-barrier gradient. Once saturated, it practically never dries out.
Unlike the beads in expanded polystyrene styrofoam, extruded polystyrene is not granular. You cannot see individual grains.
It is commonly available in rigid boards that are usually 2 or 4-feet by 8-feet and 2 to 4-inches thick.
The Owens-Corning brand is pink.

The Dow brand is blue.
The challenge with rigid board insulations is fitting them into odd-shaped spaces.
Both expanded and extruded polystyrene foam have very poor resistance to liquid hydrocarbons (oil, gasoline, diesel, etc.). They melt into goo when exposed to gasoline.
Polyethylene
Polyethylene is a soft foam insulation. It is considered to be "closed cell" and performs well in wet environments. It is kinda hydrophobic - water don't like it and it don't like water.
Its most common use is tubes for pipe insulation but it is also available in sheets. For a research project I was provided chips of polyethylene that were made by chipping sheets. I don't know if the chips are available commercially.


Of the four insulations described, polyethylene is the best in wet environments. It is soft with no structural strength and very low density.
Polyethylene foam has good resistance to liquid hydrocarbons (oil, gasoline, diesel, etc.)
It can be expensive.
Alternatives to Foam
There are many alternatives to foam for flotation. Two that interest me are plastic soda bottles and ping-pong balls.
Plastic soda bottles are polyethylene plastic and they last forever. They are filling up our landfills and not degrading. They are available in sizes ranging from 4-ounce bottles to 2-liter bottles. You could use a variety of sizes to fit your flotation chamber. The upsides are they will probably last forever and they cost nothing. The downsides are they don't fit snuggly together and removal, if needed, would require intrusive surgery.

I don't know much about ping-pong balls but I am intrigued. They are plastic but I don't know about their longevity. They won't fit snuggly together but removal, if needed, would require only a small hole and a vacuum hose.

To foam or not to foam?
If you decide to foam, at least now you have some ideas about what foam to use.


